Discolored Acrylic Spa Surface

To:  Multi-Tech Products

I have a spa that is very new (about 2 weeks), and it has already developed some yellow stains on the surface.  Can you tell me what caused it, and how to remove them?  I have attached a photo. (below)                                                                                                         Thanks,      John

WP_20171107_11_38_53_Pro

To: John

Although it is difficult to diagnose a problem with very little information on how the spa is used and maintained, this issue looks like the same problem we have seen in the past.  Almost 100% of the cases involving discolored acrylic surfaces are caused by chemical attack.  We have seen many examples over the years where spa owners have used the wrong water treatment chemicals or water fragrances, and it resulted in damage to the acrylic surface.  It doesn’t take long exposures to cause the discoloration.  The most common culprit in recent history is the chemical “Tri-Chlor” (Trichloroisocyanuric acid).  This product is sold in tablet form for swimming pool water treatment. It is the most popular swimming pool chemical sold in stores like Home Depot and Lowes. Trichlor is essentially a combination of Cyanuric Acid (CYA) with chlorine.  Dispensers are used in pools to slowly dissolve the tablet.   The dispenser floats on the water surface, but in a spa, it normally moves to the water’s edge and rests along the spa surface due to water agitation.  So, the acrylic surface close to the tablet is exposed to a very strong acid, which bleaches the pigments.

The problem has occurred enough to cause one acrylic manufacturer to conduct lab testing to verify the problem with Tri-Chlor.  Their testing has proven that Tri-Chlor can cause bleaching of acrylic pigments.  The following photo shows another example of this chemical attack from Tri-Chlor that is from their testing program.  The color of the stain depends on the acrylic pigmentation, and influences from other chemicals used in the water.

Bilo photo

Their testing results prompted them to publish a technical bulletin for their customers, and to produce a label (see below) to be applied to new spas.  The label warns the spa owner to avoid Tri-Chlor, and the label should be used by all manufacturers and dealers.

TriChlor

Spa owners should refer to their product operation manual or consult with a qualified dealer or the manufacturer to learn recommendations on proper water treatment chemicals to use, and what products should be avoided.  Di-Chlor (Dichloroisocyanuric acid), in powder or granular form, is a weaker acid and a commonly recommended product for hot tubs and spas.

The good news is that, in most cases, the discoloration doesn’t penetrate too far into the surface.  This means that our standard procedures for sanding, buffing, and polishing can be used to remove the top surface layer to recover the original spa coloring.  This procedure is at:

Click to access BUFFING%20AND%20POLISHING%20NCINSTBP-v.pdf

I hope this helps you, and thanks for trusting us for help.

Regards,                                                                                                                                                 Rob Clos


What causes wrinkling in a repair?

TO: Multi-Tech Products

What would cause this wrinkling during a repair?   (see photo below)

image1


Thanks,
Ryan

To: Ryan

I could give a more specific answer if you had provided more information. Were you using our MMA system, or the Quick Glaze process? What filler was used? What steps did you take prior to seeing the wrinkling? Did you follow our procedures?

So, I will try to explain all of the potential causes. If you were using the Quick Glaze system, it could occur during the spraying operation.

The Base Coat is first sprayed on the surface, and it contains a hardener that cures the coating. The Clear Coat needs to be applied before the Base Coat is completely cured. Otherwise, the solvents in the Clear Coat will attack the Base Coat, and it can create the wrinkling. The Clear Coat can go on directly over the color. The Finishing solvent can also be sprayed directly on to these coatings.. All of the coatings should be applied consecutively, as quickly as possible. Under normal ambient temperatures, the time window is about 45 minutes. Higher temperatures will reduce this working time. Waiting 45 minutes or longer to apply the Clear Coat will make the Color coatings wrinkle. The retarder must also be used as the reducer for the base color coat for thinning. Against all of our recommendations, some people fail to use the QG Clear Coat. If there is no clear coat on the application, you will need to remove the color by sanding and applying a lacquer thinner to remove all of the coatings before re-applying them, correctly..

These issues do not exist with the MMA system. Furthermore, the operating time windows on applying the various MMA coatings are very flexible

However, the MMA System or the Quick Glaze system can lift or wrinkle a previously sprayed repair. For example, it can occur when an epoxy or other unknown coating was used as the base color spray. However, both systems can work well as a touch up of a complete refinish job unless the refinish coating that was used was an epoxy, or there was no clear coat used..

A less common cause is something wrinkled under the color and the clear coats. It could have been the filler, or you sprayed over uncured resin in the FRP shell? If it is uncured resin with this level of wrinkling, the area would be soft when poked with a screw driver or sharp tool.

Hope this helps.

Rob


Why did a repair fade in this spa hot tub?

To: Multi-Tech Products:
This repair (see pics) was done about 3 months ago and is now turning cloudy. What could be the cause ?
I’m thinking a reaction to spa chemicals?
Doug

IMG_1621 IMG_1622

To: Doug,
It is difficult to determine the exact cause of this problem without knowing some of the history and common water chemistry maintenance practices used on the spa. There are least two causes. Information on them follows.
Here is information on common chemical damage to acrylic spas. I don’t suspect this to be the cause, since issues would occur at other areas of the spa – not just at the repair.
https://multitechproducts.wordpress.com/2014/12/15/surface-discoloration-in-an-acrylic-spa/
The next article describes what can happen to our Clear Coat if it is exposed to moisture before complete curing – normally requiring 24 hours..
I think this is the most likely cause in your case. I am assuming you used the MTP Clear Coat to finish the repair, since we believe it is an absolute necessity to achieve a quality repair.
Three months is normally the time window that post cure repair issues show up.
https://multitechproducts.wordpress.com/2012/06/
The repair could certainly be damaged by strong oxidizing chemicals (e.g. tri-chlor). However, Tri-Chlor would also cause fading in the acrylic in other areas of the surface. So, I don’t believe tri-chlor exposure is the culprit.
If the problem is simply premature exposure to water, it is an easy fix. You just need to remove the repair coating, and respray.
I would recommend sanding with 400 grit sand paper to remove the top coating. Light sanding can remove the damaged Clear Coat while preserving the Color Coat. At least, it could limit the need to spray more of the Color Coat.
After completing the repair, it is very important to keep the repair zone dry for a sufficient time to allow the coatings to completely cure.  Exposure to any form of water may effect the coatings.   If the repair was below the water line, wait for at least 24 hours before refilling the spa.
This communication addresses the post-repair cure procedure, and how to place the cover to protect against water getting on the repair zone.
https://multitechproducts.wordpress.com/2012/07/02/118/
Hope this helps,
Rob

Can I repair the pedestal base of a vitreous china lavatory

To:  Multi-Tech Products

The pedestal base on my vitreous china bathroom lavatory is broken into two pieces.  Do you have a product that I can use to glue them together?

Thanks,

Tom


To: Tom

Yes, you can use our Poly-Filler to glue vitreous china together.  You will need to prepare the surfaces to be joined by sanding with 220 grit wet/dry sandpaper.  It will set in about 3- 5 minutes.  If you need more time, you can refrigerate the Poly-Filler prior to use.  This will double the working time.  When completed, there will be a line at the joint.  This can be hidden using our MMA repair kit, which can be supplied in a color-matched coating.  The entire pedestal would need to be refinished to achieve a uniform color.  You will need to let us know the manufacturer of the lavatory, and their color name.  You will follow the directions shown in the MMA procedure, which is available in our website.

Thanks,

Rob Clos

“Can a plastered Hot Tub be resurfaced with the FRL System?”

To: Multi-Tech Products

I have attached a photo of a hot tub installed in a hotel. It is a plastered spa, and large chips are coming off of the surface. Can it be salvaged using your FRL System?
Thanks,

Jim
untitled5

To: Jim

The quick, simple answer is yes, it can be used to renew the hot tub surface. However, before I give the complete answer on FRL resurfacing of a plaster finished hot tub, I want to address common issues with the practice of using fiberglass coatings over plastered swimming pools. Even though they are the same application, using a fiberglass coating on a plastered swimming pool brings much greater risks for failure than using fiberglass over plastered hot tubs.

There have been companies that specialize in a total refinish of pools by applying a fiberglass composite on top of the plaster. Therefore, there are a lot of these swimming pools in service today that have experienced a high rate of failure. Repairing these failed jobs have great appeal to repair technicians. Even complete pool resurfacing can be achieved with our FRL system. The larger the pool, the bigger the job, and bigger the pay check, right?  Our advice is don’t be quick to jump for that big pool job. Even though it might appear to be a great business opportunity, it is very risky to re-surface plastered swimming pools. Applying fiberglass resin systems over plaster does not always provide for resolution of the underlying issue, deteriorating plaster. These overlays of FRP usually fail as the plaster continues to deteriorate.

The explanation is that although advanced resins are utilized, and the top layer bond is great, adhesion between the different layers of fiberglass, plaster, and concrete base will decline. This leads to complete failure of the composite structure application. Some resurfacing will lose adhesion in big sections, and some will just have small areas that come loose. It is best to refer the major failures to a contractor that will completely re-plaster the pool. On the same note, the smaller failures provide the opportunity for repair professionals.

The following photos show one example of a swimming pool that had been completely over laid with fiberglass, and a partial repair was made, successfully. So, if the plaster has not become too brittle and chalky, a pool with small area(s) of failure can be repaired with the FRL System. It can provide a worthwhile extension to the life of the pool before a complete re-plastering is necessary. However, we would not recommend providing a warranty on these partial repairs.

2013-05-09 10.51.50 Before

2013-05-27 11.43.35After

Your hot tub can be refinished with our FRL system. It would require a complete resurfacing of the entire surface (nothing partial). Therefore, you should not commit without a prior inspection of the empty spa. Based on my analysis of your pictures, the glaze layer of the plaster is peeling. This layer is comprised of about .125″ thickness of the total original plaster finish. The glaze was created as part of the total installation process when the plaster was applied during the original construction.

The primary issue in resurfacing with any fiberglass product including our FRL system will be the ability to achieve prolonged adhesion to whatever you are applying it to – in this case the aged glaze or exposed plaster. But, if you re-surface the entire plastered hot tub, the FRL resin layer acts as a cap over the plaster, although it does rely on achieving a strong, long-term bond to the substrate. Hot tubs are smaller than pools so as the plaster layers deteriorate, the smaller bonding surface areas stay in place for the long-term. Ideally, the smaller volume allows for sufficient structural strength without the need for the strongest substrate composite integrity. Thus, it will stay in place and function correctly as a capped surface.

An inspection would be necessary to determine the condition of the plaster. Plaster fails by becoming brittle and chalky. The core plaster layer is under the glaze and on top of the concrete structure providing the shape of the hot tub. The primary cause for plaster becoming chalky, soft and brittle is from over-use of pool chemicals. So, you should remove the glaze in a few areas, and assess the condition of the plaster underneath, as well.

The FRL resurfacing procedure includes grinding and filling the substrate to assure smoothness, and provide a surface that allows the best possible bond with the FRL resin. That process will expose the core while leaving some of the glaze in place. If inspection confirms that the plaster is hard and shows little evidence of brittleness or chalkiness, then a re-surfacing with the FRL system would be advisable. One advantage of the FRL finish compared to a plaster surface is the ease of cleaning. The surface is much smoother, less porous and will be more durable.

Important Note: Resurfacing over peeling plaster is risky, and should be attempted only with everyone understanding the issues and potential for success or failure.

My experience is that plastered Hot Tub resurfacing with the FRL system has yielded long term adhesion and less call-backs when good judgment has been used during inspection and preparation for the refinishing stages. The same judgment should be used when establishing a warranty.

Rob Clos

TO; Multi-Tech Products

Wow, the before and after pictures of this hot tub are incredible. I’m amazed at how well it was repaired. Is an FRL system pretty common? Or do they use that on the newer hot tubs only? I’m just curious because I’ve got a pretty old hot tub that I need to get repaired.

Thanks Mia

To: Mia

If your hot tub is very old, 30 years or more, it is probably gel coat with a FRP backing, and installed in a cabinet or outside deck.  This type of product is suited well for resurfacing with the FRL system.  Refinishing a gel coat spa will give a permanent finish that will last 10 to 20 years.  The same applies to a spa made with an acrylic surface.  Acrylic spas were introduced in the early 1980’s, and quickly replaced gel coat products, due to superior performance.  These were offered as portable spas, but in-ground models were available.  Older plastered spas, which are frequently built with swimming pools, can also be resurfaced with the FRL system.

The pictures you referred to are actually a pool that was fiber glassed over plaster.  Fiber-glassing plastered pools and hot tubs is pretty common.  Companies that specialize in this service have come and gone over the years.  The business failures have been due to the liabilities from deterioration of plaster as described above.  Resins have improved over the years, which have made a difference in how long the new surface lasts.  But the main issue is that the plaster fails.  The FRL system is unique, and is designed for surface renewal.  It has proven performance in the right application.   See the above article for recommendations and limitations.  FRP is the acronym for Fiber Glass Reinforced Polyester.  This description encompasses a broad range of products with varying levels of quality.  The FRL system is designed to be used with numerous surfaces including acrylic, gel coat, ABS, and other spa surfaces.  We can refer you to a contractor that has been qualified to perform these applications.

Thanks,

Rob

How to install support beams under a fiberglass pool, spa, hot tub shell?

To Multi-Tech Products

Hello, I have a customer that needs to add more mechanical support under their spa to distribute the weight more uniformly, and reduce stress levels to prevent cracking.  It is out of the manufacturer’s warranty. What do you suggest?

Thanks,

Joe

To: Joe

The following picture shows a very nice aftermarket adjustable support added to an FRP Spa shell.

Feb 2015 download 016

The most important requirement for installing additional support is to prevent the new beam from puncturing the wall of the spa.  The method used to accomplish this is to install the beam so it transfers the weight to a strong metal plate between the beam and wall.  Please reference the picture above.

If there is a seat, step or flat area that would accept a support beam, and if it is accessible, remove any foam and expose the structure of the shell.

If you believe there is a plate and need to confirm, grind off the resin/glass to expose the plate for confirmation. The picture above shows an intended design and original equipment manufacturer (OEM) requirement. The plates were built-in at the factory at the time of manufacture. That is not going to be the case on every spa shell.

There is a wrong way to add support. One example is adding 2″ x 4″ wood stud material directly to the shell without a  plate.

IMG_0385

This is very bad practice since the large load of the spa will force the wood beam to eventually puncture the shell wall. I have seen this many times as a technician in the field. Even the nice support beam in the first picture above with its built-in,  top metal plate would pierce a normal spa wall without the addition of a strong weight distribution plate embedded in the structure or added in some alternative method.

Ideally, the best method would be a wood plate (as large as possible for the flat area). I would suggest a block of wood 2″ thick x 12″ x 12″ to start or as large as it can be while achieving good contact with the flat area. Be sure the plate sits flat against the spa structure.  Try to make it parallel to the spa base.  Use a 4″ x 4″ beam cut to size for the support. Be sure the 4″ x 4″ beam sits solidly on the deck, concrete pad or spa frame.  A plate may be necessary there as well.

IMG_0390

It would be best to secure the plate and support to the spa shell.   It should be done with Multi-Tech Products Polyester resin paste. Resin paste will provide about 30 to 40 minutes working time before it sets.  It is somewhat temperature dependent. In weather below 55 degrees, it may be necessary to apply heat after the application to cure the paste.

Grind the surface with 50-100 grit sandpaper to accept the Paste for good adhesion.

IMG_0420

Apply catalyzed paste to the plates prior to setting them in place.
IMG_0441

Secure the plate to the bottom of the spa with Resin Paste. Secure the beam to the bottom of the plate with the same “Paste”. The “Paste” can also be used to achieve maximum contact between the plate and the bottom surface of the spa structure where angle changes or uneven surfaces prevent full contact.  Good, wide area contact is needed to distribute the load.
IMG_0430

If the environment under the spa is frequently wet and the wood might eventually rot, use treated lumber, or the plate and the beam should be encased with resin and fiberglass prior to installing the beam and plate.  The following picture shows the wooden plate after encasing in fiberglass reinforced resin.

IMG_0447


If the spa needs to be lifted to insert the beam device, install the plate with paste, and allow it to set (cure).  Then lift the area up with a hydraulic jack (car jacks work, also).  Push the new beam into place (adjust beam length, if needed), retract the jack and allow the spa to set on the new beam.
IMG_0437


If additional supports are needed, repeat this process in order to distribute the total spa load throughout the spa.  One way to determine the need for additional support beams is to empty the spa, and put significant body weight in the unfilled spa shell.  If the shell moves, flexes, or the seats move downward with weight applied, this could indicate the need for additional under spa support.   This movement could would be due to either inadequate FRP reinforcement or insufficient mechanical support devices.  Properly distributed support is required to keep the spa shell from excessive downward movement due to the load derived from water and humans.  Pay close attention to the lip.  If a spa shell is built in a way to rely mostly on the edge support to provide the structure’s strength, the lip will move and deflect downward.  This would cause initial sagging and eventual cracking of the spa shell inner lip area.  Also, cracks inside the spa shell at upper corners could confirm inadequate supporting fixtures.  If the spa is within the manufacturers warranty, I would consult them before proceeding with an independent repair.  If it is not covered by warranty, good judgment must be used, but excessive movement begs for additional support to avoid problems.

Rob Clos


How do cracks occur in a spa shell?

To: Multi-Tech Products

I am a spa surface repair contractor, and I perform manufacturer warranty work and non-warranty repairs. I have a customer with an acrylic spa containing a crack at the rim. What causes these type of problems, and what is correct method to repair?
Thanks,
Carlos
To: Carlos

Carlos, thanks for your inquiry. The information I am about to share will be very valuable to you, and other repair technicians. It will enhance your overall knowledge on troubleshooting spa problems, and improve your repair results. It will minimize the potential of returning at a later date to fix the same or additional cracks. This will make you a more valuable resource to your manufacturer clients for warranty repairs. We also recommend that you know your manufacturers well. That includes the basics of their designs, and the terms of their warranty.  Understand the manufacturer’s guidelines for installation.

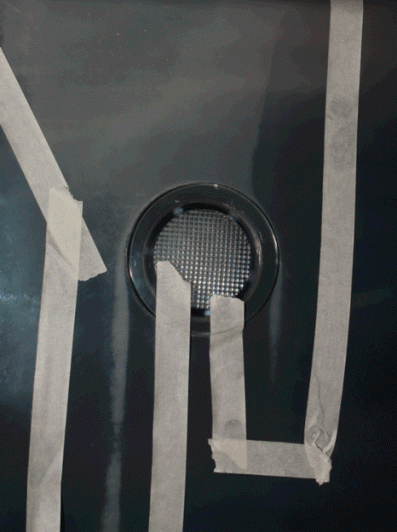
If it is possible, make a visit to the manufacturer’s plant. During a complete tour, pay attention to what they use for shell support, and where it is placed. Ask about the use of insulating and structural polyurethane foam. Check the thickness of the shell in various locations. Observe if there are any unique materials or devices used to add reinforcement. One manufacturer uses large diameter PVC pipe to provide support under the key portions of the spa (picture below). Understand that a spa is a reinforced composite structure, and the details of the reinforcement are extremely important Some manufacturers even have specifications on how much deformation along the rim is allowable under normal loads.
Also, know what the shell material is. Is it monolithic acrylic, or is it co-extruded acrylic over ABS? Is it reinforced with FRP (polyester resin with chopped glass fibers), or is it polyurethane? Is a vinyl ester used in the reinforcement composite?

spa support

Your question is a very complex one. First, you did not mention whether it is a portable spa, or if it is an in-ground or in-deck installation. You also did not mention whether it is under warranty.  Also, if it is a portable spa, does it have an ABS plastic pan for a bottom?

Before repairing a cracked spa, a repair professional should investigate the circumstances enough to try to determine the root cause of the crack. This may not be easy, but you should strive to define the most logical cause. First, cracks occur when the material is subjected to a stress that exceeds its strength. The material strength will decline as temperature is increased. Certain types of chemicals will also accelerate crack formation. See other blog entries that discuss chemical attack. Acrylic is known as a fairly brittle polymer, and will crack under excessive stress. Obviously, a large impact from another object will cause a crack.

In the absence of an impact, most spa cracks occur due to inadequate structural reinforcement. An 8-ft. spa may contain 400 gallons of water, which results in about 3200 pounds of weight. Add a few people, and the total weight can exceed 4000 pounds. Unless the stress ( pounds per sq. ft.) from this weight is spread over the entire surface area, it can cause a crack(s) at the high-stress points. This is typically at the rim.

So, manufacturers of portable spas must incorporate enough support beams or other devices under the rim, seats, and floor to accomplish this stress reduction. Sometimes, manufacturers fail to accomplish it 100% of the time. The following picture shows one example where the weight actually caused the vertical support boards to bow under the weight. This magnitude of deflection is very likely to cause sagging and cracking of the rim.

IMG_0088

If you look behind the skirt of a portable spa, and see any evidence of deflection, you can conclude that additional support might be needed. Sometimes, you can determine this by checking how straight and level the top edge is. Portable spas should be placed on a concrete or other strong pad to facilitate the function of the supporting structure. If the spa has a strong ABS base, it enhances the overall performance, providing it has the required design.

In troubleshooting root causes, it is helpful to know that if the crack is separated, the area was in tension. If it is pushed together with a ridge, it was in compression.

Now, if the spa is in-ground or installed into a wooden deck, it falls to the installer to assure that ample support is included under the frame, rim, seats, and foot-well of the shell to distribute the weight around those load-bearing surface areas. A commonly used technique is to wash sand into the cavity between the shell and the excavated dirt.  It is important to provide support that limits deflection in all critical areas similar to the photo above showing the use of PVC pipe.  The rim area also needs to be supported.   The information above will apply to analyzing the cause of cracks in these type installations.

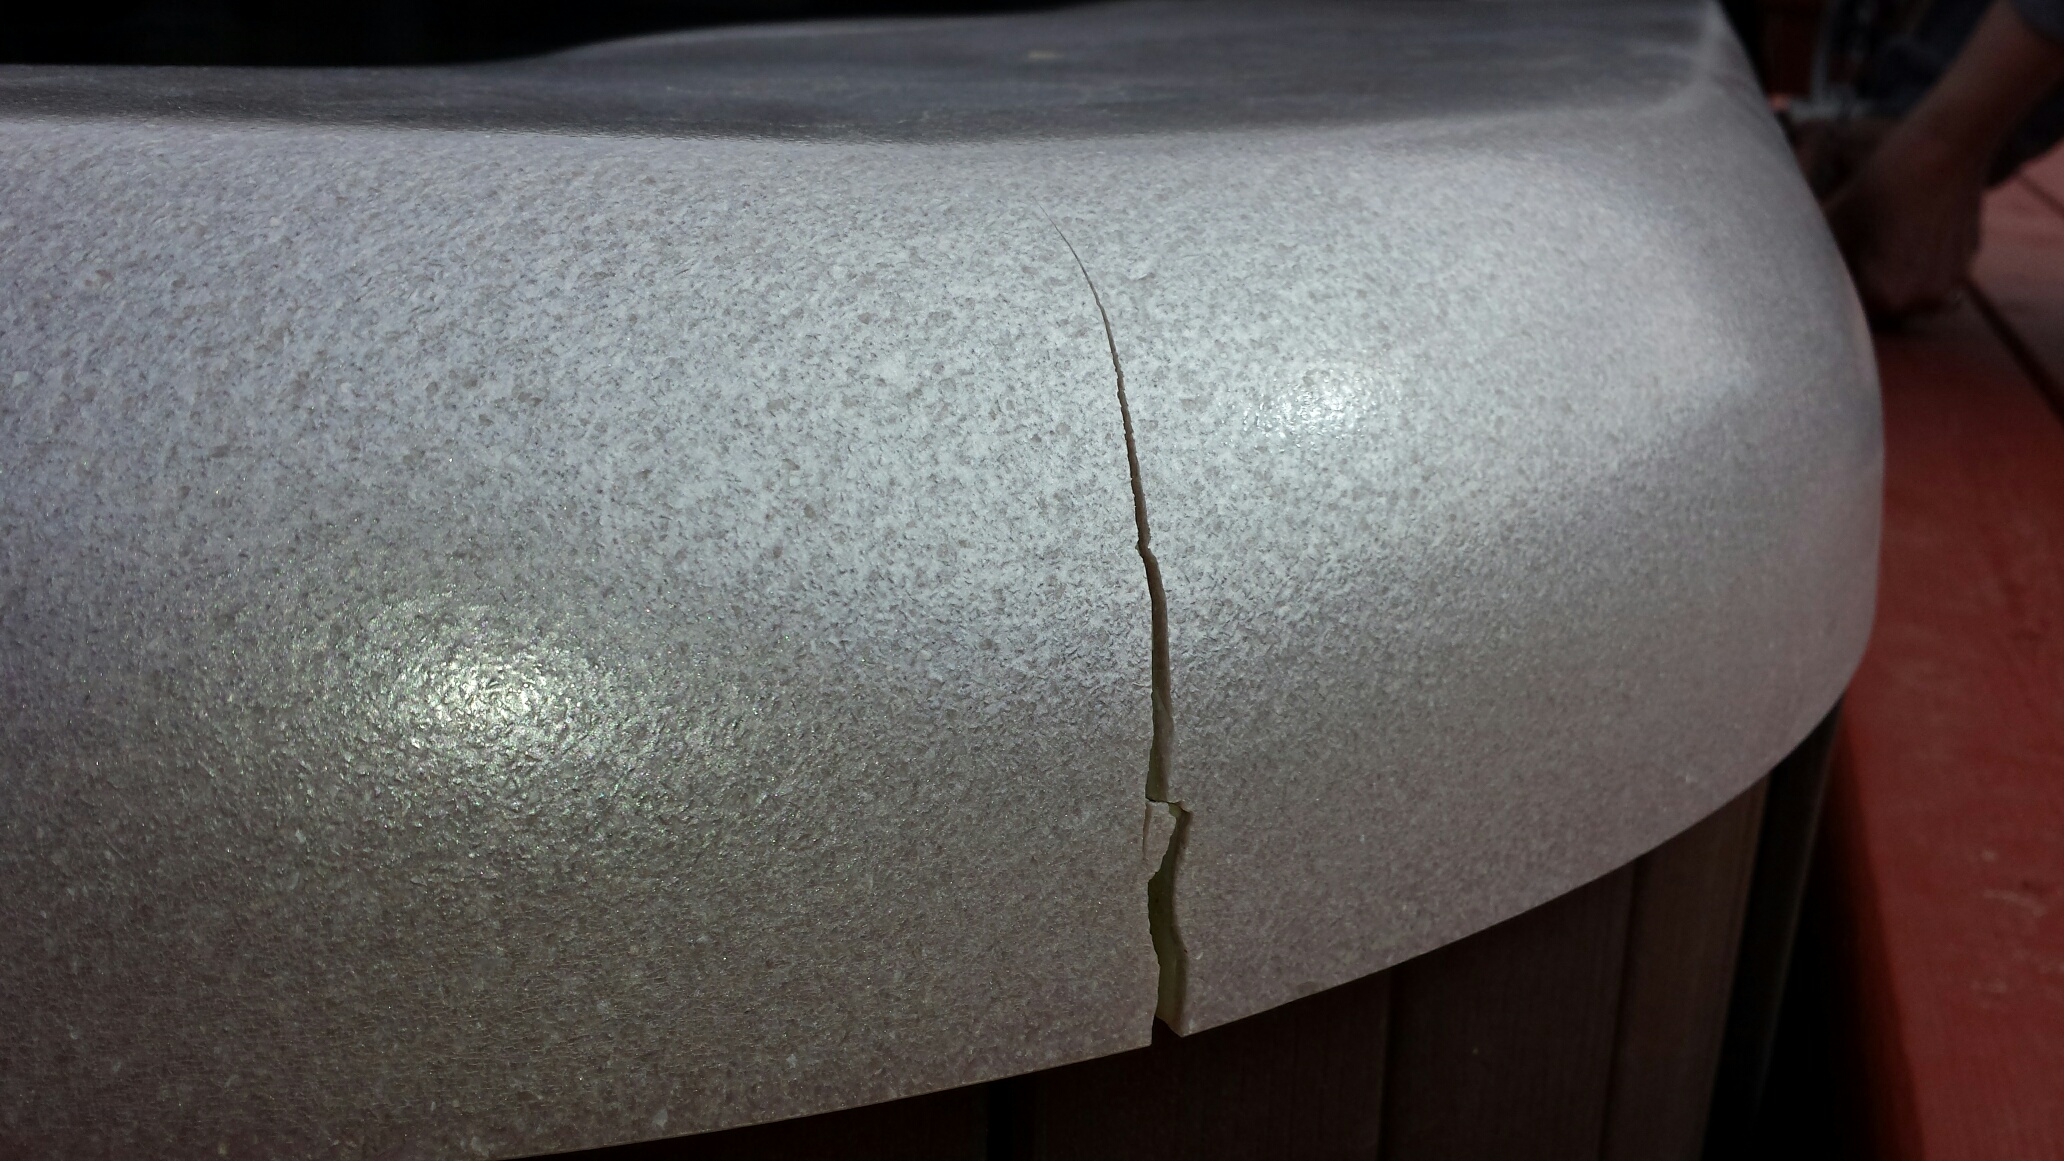
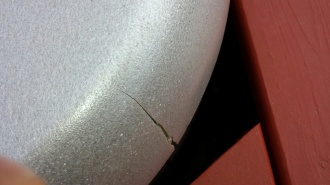
I have included some pictures showing some examples of cracks from over stress.

Crack 1Crack 2

photo 1


The cracks can be repaired by following Multi-Tech Products’ standard crack repair procedures as shown at the following link.

http://www.multitechproducts.com/content/Procedures/SPA-REPAIR-Quick-Glaze%20_revised-10252011.pdf

The spa shown in the next photo developed cracks at the rim.

photo 2

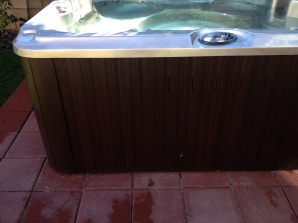
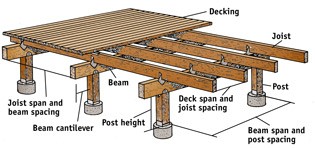
Please note the brick blocks it sits on.  Unless the spa has an ABS pan base or other type of rigid platform between the bricks and the spa bottom and constructed as a self-supporting unit, it would not comply with normal installation specifications from a manufacturer  Therefore, cracks would not be covered by a warranty.  Most portable spas are designed to set on a strong, steel reinforced concrete pad or a wood deck with correct spacing of deck joists, correct beam span, and proportionate post pillar spacing for strong deck construction.  A weak  or improperly supported deck would cause the same type of crack shown in these pictures.  This spa’s crack was at the center of one rim edge.  This suggests the spa is suspended at the rim with little support in the critical areas mentioned above.  Large spas (> 7ft.) are more likely to crack in this manner.  The following diagram shows one example of a well-designed deck.

Pad

A technician should inform the customer of these issues, and make a recommendation to correct the support issues.  If the customer chooses to ignore the advice but still wants the contractor to perform the repair, a warranty should not be provided.  Also, this example of a crack edge would require structure repair at the back of the shell before the cosmetic repair was performed.  Otherwise, new cracks would likely form in the future.  The best service is to fix all of the problem sources to prevent future call-backs, and an unhappy customer.

Thanks,
Ken Wolfe
Consulting Chemical Engineer

Can I paint an acrylic spa/hottub with Zolatone, pool paint or bathtub refinish coatings?

To: Multi-Tech Products

I own a spa service company, and I have a customer with a unique problem. He owns a large yacht, which had a spa installed several years ago.  It has been abused by failing to keep it covered when not being used. Also, it may have been exposed to the wrong water maintenance chemicals over the years. It is extremely faded, and has crazing and cracking in some areas of the acrylic surface. Since it is still functional, and would be expensive to remove and replace, the customer is inquiring if there is a simple way to renew the surface color and fix the cracks. He is asking about painting with a pool paint or Zolatone® to match the granite appearance. There are a lot of jets in the spa, and some would be very difficult to remove, if a spraying operation was required. What do you think?

Thanks,
Bill

IMG_3257

TO: Bill

I agree with you. The spa is crazed and cracked mainly due to over exposure to the sunlight (i.e. no cover in use).  Also, the use of strong water chemicals like Tri-Chlor was probably the major factor in the fading, although the excessive UV exposure contributed.  Acrylic sheet manufacturers have confirmed that Tri-Chlor will fade the pigments in acrylic spas and should be avoided for use in maintaining hot tub water chemistry.  Tri-Chlor is intended for use in swimming pools.
First, Zolatone® is a brand of hybrid lacquer paint, and will peel from a wet environment surface rather quickly.  This product, although speckled in color, is intended for top-side and non-wet areas in marine, auto, and industrial applications. It should not be used below a spa water-line, in tank or wet bilge areas. Even clear coated, Zolatone® will delaminate when painted onto constantly wet and high moisture environments.
So, a spa/hot tub refinish is out of the question. In fact, there is not a coating available that would provide a “quick” fix to renew a crazed/cracked acrylic hot tub surface long term. This even includes swimming pool and bathtub coatings, as well as marine finishes, and let’s not forget gel coat as paint. The reason is that the acrylic surface will continue to crack, craze, expand and contract under the applied painted coating. The cracks will simply come through, along with rapid delamination (peeling) of the coatings. These paints are just not made to withstand heated water, constant moisture exposure or chemicals.  These factors will cause  bubbling and peeling of the coating.  However, they do work well when the surface stays dry.  Moisture must dry quickly from these coatings in order to stay pristine, and adhered to the resurfaced substrate. They work well for resurfacing bathtubs. The tub is filled (gets wet), drains (dries) and the surface will continue adhered to the substrate.  Overuse, or a dripping shower head or fixture will result in constant wetness and the paint will fail.  Furthermore, pool coatings or marine anti-foul paints have an application life of only about 3 years. Therefore, these coatings would have a short life expectancy on a spa in a spa application.  Under spa conditions, we have seen these types of coatings fail within a few months from application.

Since there was no commercially available means to meet this need, we developed a process that works, and performs well under normal spa and wet conditions.  It is a special resin embedded with glass fiber reinforcement. The reinforcement along with the high performance resin adheres to the original spa structure, and creates a barrier surface with minimal expansion and contraction. The system is laid-up by hand and will give an expected life of 15 to 20 years. We developed this system specifically for spas, tanks and challenging wet areas as a economical method to extend their life.  It is our FiberGlass Reinforced Lining (FRL) system. It adds a new reinforced, white colored layer on top of the existing surface or prepared structure. You can see the system components and procedure at the following link. It is contained under the Technical tab in our website.
http://www.multitechproducts.com/content/Procedures/FRL%20PROCEDURE%20Final%20Draft.pdf

Your application doesn’t require removal of the jets or other fixtures, since the crazed areas on the subject spa do not appear to be causing severe peeling or delamination of the acrylic layer.  It would not be necessary to remove the acrylic or repair the areas before applying the FRL system.  The finished FRL layer will be about 1/8” thick, so it will contribute some additional strength.  In other words, it is a structural finish.  Since the FRL final color coat is white, it will provide an attractive textured finish and appearance that hides the underlying fiberglass throughout the FRL application.  It is easy to clean, and is resistant to fading by sunlight.    With proper water chemistry maintenance, it will retain its gloss.  It has proven to add long term life to spas in these high end settings where replacement was not an easy option.

I hope this helps. Our Customer Service Department will help you in ordering the proper kits and materials to do the job.

You can see the FRL components at:

http://multitechproducts.com/resin-fiberglass-resurfacing-kit

Thanks,
Rob Clos

“How to transition from Bath Re-finisher to Spot Repair Technician”

To: Multi-Tech Products

I am the owner of a Bath Refinishing business. We currently specialize in refinishing bathtubs, showers, sinks, counter tops, etc. We have recently been asked by several plumbing supply companies to start offering bathtub spot repair and warranty work for their new bathtubs. There currently is no one offering this service within 100+ miles. While we can do an amateur job of color matching and feathering, we are not proficient at this type of work. Do you offer training or recommend a training company so that we can become proficient in this industry?

Please feel free to call or e-mail me. I am eager to discuss this with you.

Thank you,
Josh
To: Josh

We want to thank you for your interest in Multi-Tech Products for bath surface repair materials.
When people have experience in bathtub refinishing and use of our bathware repair materials, we find it is an easy transition from re-finisher to spot repair technician. The key is the right equipment, the right repair system, and the correct color for the brand of bathtub or spa being repaired. Although there are color variations in the industry, and within a manufacturer’s products, our colored systems can be finely adjusted by an operator with relative ease. Usually when ordering a specific color associated with a brand, it will be delivered to you very close to the manufacturer’s color standard and adjustments will be minimal. There are aspects to a specific product that can change color from the exact standard, which may cause the need to adjust color of the repair coating.  One example is color can change in acrylic-surfaced products as it is thermoformed into the tub shape.  Other potential color changes can occur due to the type of surface material, the unit age and technician ability.

Our Customer Service Department will help you to order the MTP recommended Starter Kit.  It will help you get acquainted with our spot repair materials. You should experiment with it on something like a scrapped bathtub that one of your retailers might have in stock. You should also practice using the proper air brush. The kit will include complete instructions, and will have a filler, color coating and a clear coat. It is our experience that most re-finishers use this kit as a first step in getting started performing spot repairs without a full training course. The most important tool for performing spot repairs is the correctly selected air brush with an adequate capacity (CFM) air compressor. We offer all of these tools.
We have two systems for surface repair materials:

1) MMA System which is utilized by manufacturers to achieve that perfect factory repair. (Polishing is required on the sprayed coating due to inherent factory air contamination)
2) Quick Glaze System which is normally chosen by repair professionals for field service. (a non-polished, quicker application because of less air contamination in homes)

Both systems use our Poly Filler and our coatings, which include a base color followed by a clear coat to protect the color from the environment. These coatings are applied with a single action, gravity fed airbrush.   I want to emphasize the importance of using the right airbrush, which is described and featured in our instructions. The other important consideration is the choice of the right type of mini compressor “tank type” with motor (1cfm) that delivers the optimum spray performance at 45 to 55 psi pressure for this specific style of airbrush and coatings.  If you make the wrong decisions regarding these critical factors, you will set yourself up for product performance problems such as  the coating being sprayed too “dry”, poor spray quality, or color and gloss matching.

The instructions will guide you to all the right tools. You will also find all recommended tools and accessories on our site.

Here are the links:
http://www.multitechproducts.com/categories/Quick-Glaze-System/
http://www.multitechproducts.com/categories/MMA-System/

Instructions:
http://www.acrylicfiberglass.com/Procedures/BATH%20REPAIR-Quick%20Glaze.pdf
http://www.acrylicfiberglass.com/Procedures/BATH-REPAIR-MMA.pdf

Tools on our site:
http://www.multitechproducts.com/electric-tools/
http://www.multitechproducts.com/paasche-h-airbrush-sets-extra-jars-longer-hose-options/

Please let our Customer Service Representative know what bath tub manufacturers supply your market area.
You may want to get that information from the supplier that is encouraging you to get into the repair business.
This will help you decide on initial color(s) and the correct repair system to order.
After becoming proficient in bath repair, I encourage you to expand your services to spa/hot tub repair. This can be very lucrative, since repair fees are generally higher. Procedures are similar, but you must use our Acrylic Filler rather than the Poly-Filler, since a spa surface is considered to be wet constantly.
Hope you find this helpful,
Rob Clos

Rob,

Thank you for the response. I look forward to using Multi-Tech surface repair products.
I am excited to test your Starter Kit and will be placing an order for the airbrush kit and supplies/products as soon as I have reviewed the options. Please don’t hesitate to call me if you have any questions.

Thank you,

Josh

Can I Repair a Small Crack in Vitreous China?

TO:  Multi-Tech Products

I am trying to repair a hairline crack in a vitreous china (white Kohler K6652) service sink.  Which product would you recommend and what color white?
Thanks
Cindy
Cindy,

Unfortunately, a hairline fracture in vitreous china means there is a crack all the way through the fixture.  Vitreous china can be repaired and even glued back together with our colored Poly Paste product, and we have it in Kohler white.   However, the issue is how to get the Paste into the fracture.  Unless there are separated (broken)  pieces  than can be glued together, you would have to grind a “V” groove through the entire thickness of the sink.   Creating this “V’ groove would produce more damage to the surface than the original hair-line fracture, since it would be very visible.   Also, the back of the unit would need some kind of reinforcement to hold it together.  This procedure could be used if there is good access to the sink, but there are complications.

The repair would be complicated and require a refinish of the whole sink. The next question would be,  “should a service sink be completely refinished?”   The answer is no.  A service sink probably gets too much use and is exposed to damaging impacts, so a refinish would not last very long.  It could also be exposed to strong cleaning chemicals, which would cause the refinished surface coating to fail.

If it is sufficient to achieve a fix simply to prevent leakage through the crack, it could be repaired as described above. Be aware of the aesthetics limitations, and I would not give any kind of warranty.

Many things to think about. But, it is just wise to sometimes walk away from certain jobs. And sometimes, a technician needs to just make things functional too.

Hope this helps,

Rob